Approach
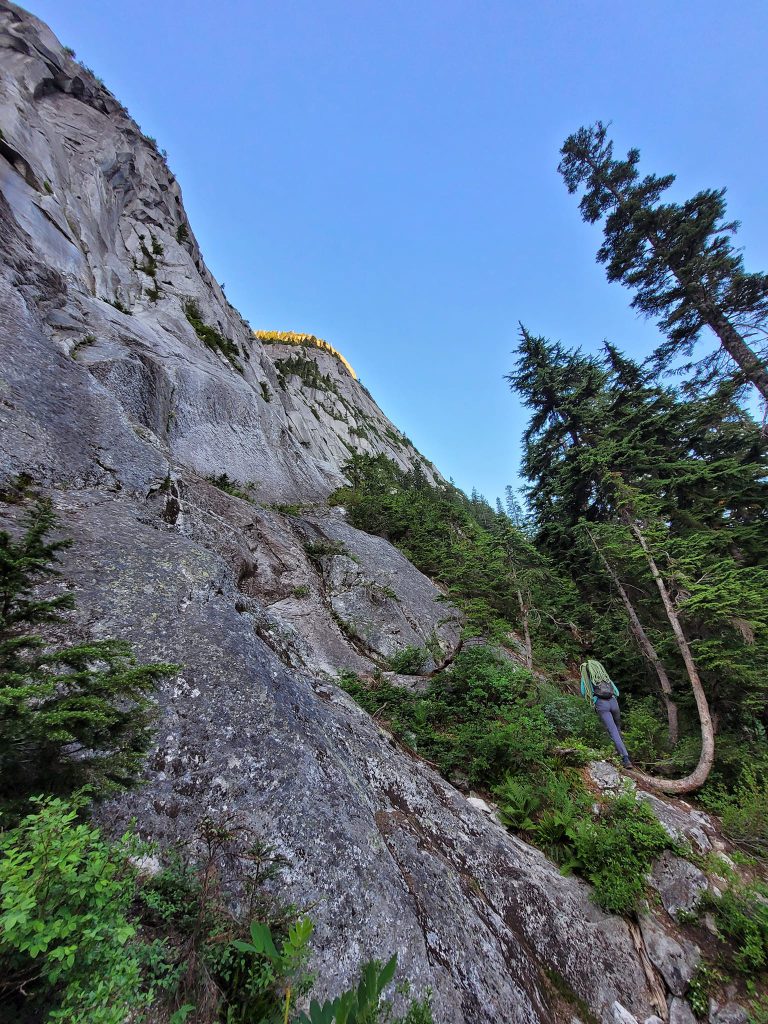
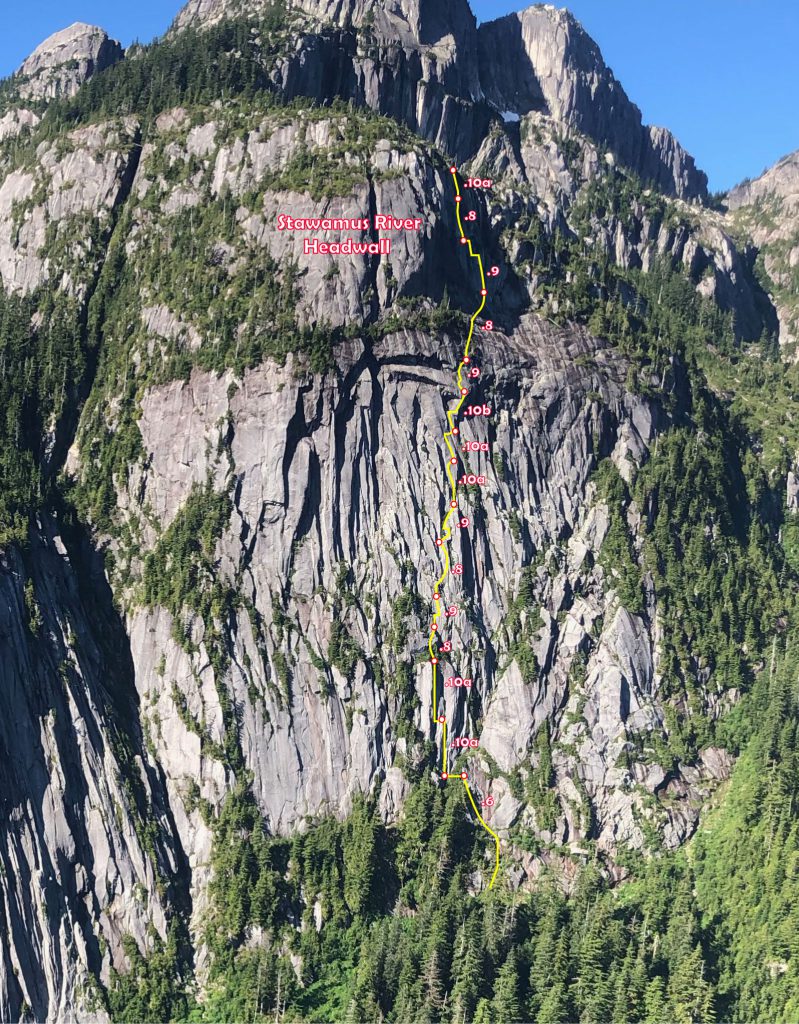
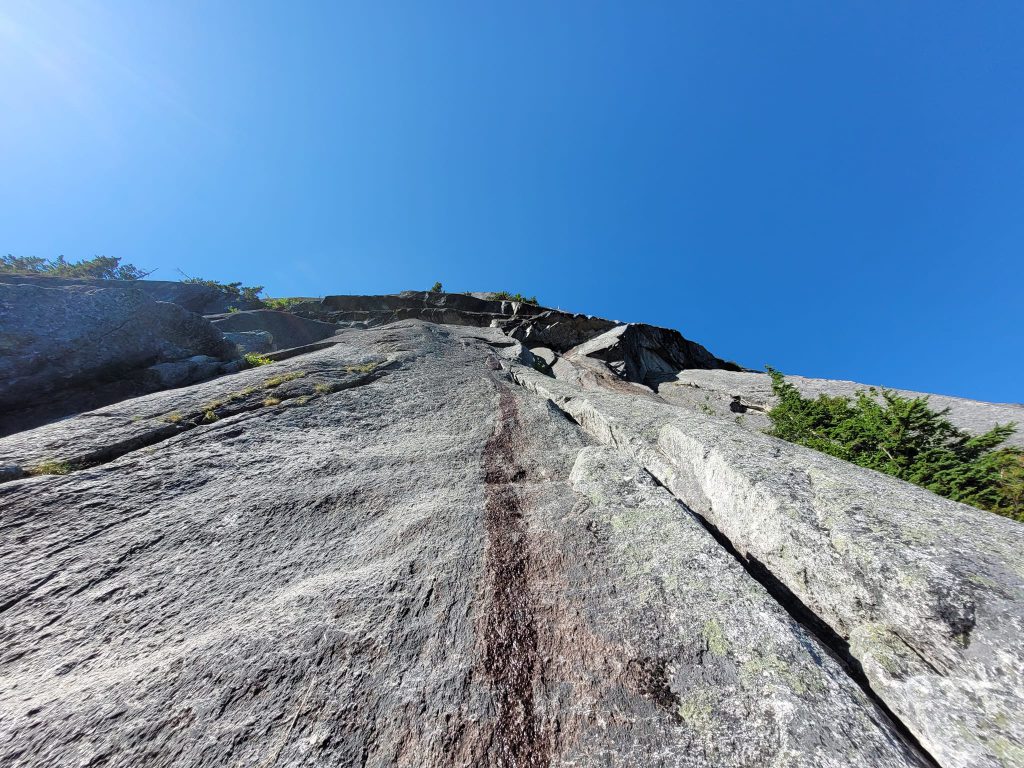
About 1 hour, high clearance required. Park at a pullout on the left identified by a large rockslide. Locate the cable burma bridge to cross the Stawamus River and follow the good trail to the base of The Fluffy Kitten Wall (30-40 minutes). From there, a crude trail continues right to the Stawamus River Headwall. The base of the route is near the top of a prominent fallen tree, the start being a nondescript but most obvious weakness through this section of the wall.
Approach


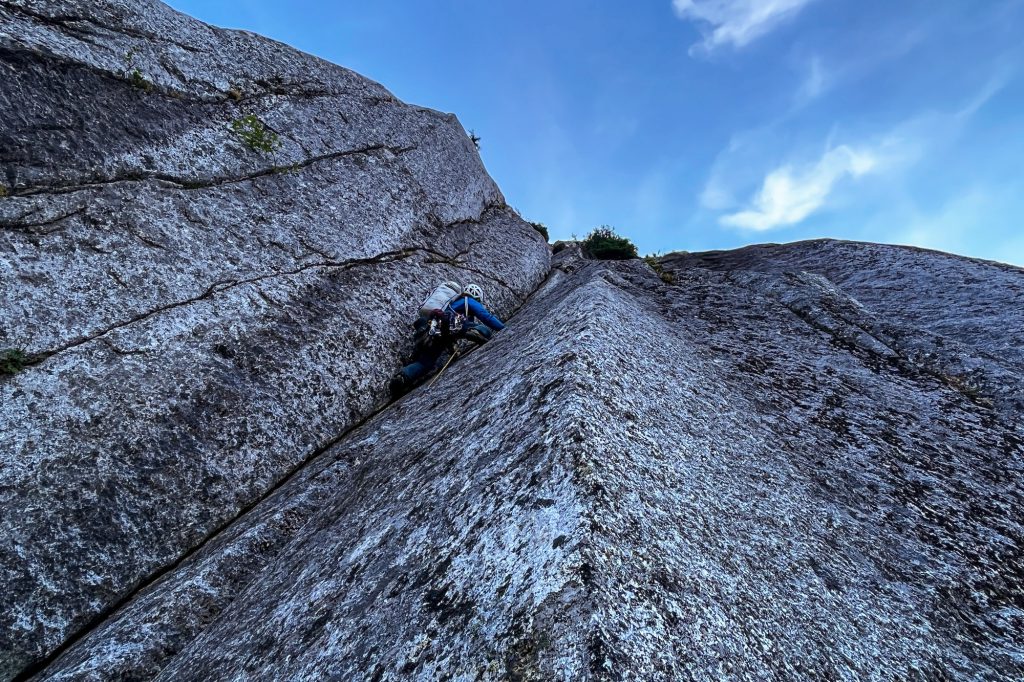
P1 – 5.6, 60m
The least inspiring pitch. Climb the most obvious corner weakness with some bush pulling.
Move
Move the belay left 8m on 3rd class terrain.
P2 – 5.10a, 30m
Step right of anchor to gain a wide flake, at the top of the flake move slightly right past a bolt into a shallow groove, at it’s top step back left past the main corner and climb the juggy arete to nice belay ledge.
Top of P2
P3 – 5.10a, 35m – “Baby Pillar”
Move left into the obvious corner using either the hand crack in the corner or the adjacent face splitter or both. Finishes with an awkward bulge past a bolt and a bit of step kicking to the belay.
Can link with P4 (50m linked)
Starting P3
P4 – 5.8, 15m
Up the awkward, steep corner which quickly relents to easier terrain.
P5 – 5.9, 15m
Climb the deep finger crack on the right side of a scruffy weakness. Move right past a bolt to the most righthand fingercrack.
Can link with P6 (50m linked)
P6 – 5.8, 35m – “Spiny Dykes”
step right off the belay and then up, trending right to a difficult to spot bolt. Nice face climbing on cool dyke feature links intermittent cracks. The bolted belay is off the line to the left at the top of the pitch.
Top of P6
P7 – 5.9, 30m
Pass bolt off the belay and move right to a clean slab passing another bolt to a horizontal crack which traverses left and past a final bolt at the crux bulge.
P8 – 5.10a, 25m – “Triple Cracks”
Climb the excellent thin cracks to final thin face move right to the belay.
Top of P8
P9 – 5.10a, 30m
Follow the deep handcrack until it thins out and vanishes, from here follow the dyke feature right past bolts and trick crux around an arete, once around the arete step (traverse) down and right to belay on a small stance (note: it is easy to miss this belay and continuing up the next pitch will result in horrible rope drag!)
Following P9 
Following the end of P9, final traverse to anchor
P10 – 5.10b, 25m – “Overhang Bypass”
Climb the handcrack in the back of a flaring corner, at it’s top traverse right along another amazing dyke feature to an exposed crux right on the edge of a tilted arete. Easier climbing takes you to an eagles perch belay.
Can link with P11 (50m linked)
Start of P10 
Near top of P10, traversing right of the overhang 
Finishing P10
P11 – 5.9, 25m
Stimulating face climbing past several bolts and then traverse easy ledge up and right to belay.
Traverse to top of P11
P12 – 5.8, 60m – “The Balconies”
Right trending face climbing through gritty low angle terrain. Several bolts mark the path. Aim for a shallow right facing corner at the top which leads you onto a deep belay ledge below the headwall. Good bivy spots can be found in the vicinity of this pitch.
P13 – 5.9, 35m
Move right off of the belay into a steep, right facing flake crack. Continue up corner above, move left past a bolt and up aesthetic, steep finger cracks until it is possible step left again onto a ledge past a large tree to a horn belay at the bottom of a deep corner.
P14 – 5.8, 30m
Climb the beautiful hand crack in back of deep corner, the climbing eases with some nice stemming and well protected chimneying above.
Top of P14
P15 – 5.10a, 20m – “Vedauwoo Crack”
battle up a final steep handcrack in the back of an awkward flare.

P15
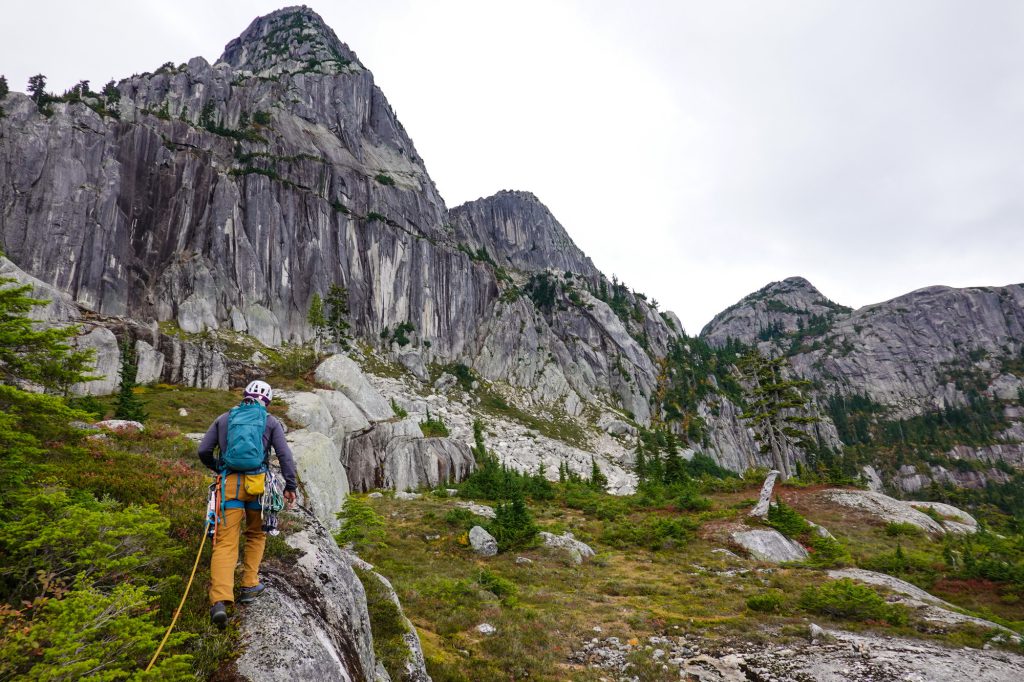
Walk
Walk west into the the heather meadows and boulder strewn basin below Mt Habrich, an easy five minute walk gains the base of the steep headwall. The next pitch starts at the bottom of an obvious right slanting ramp and chimney system.

P16 – 5.7, 35m
Find the easiest way up the short vertical wall gaining an easy ramp system the belay is at the base of a clean dihedral.
P17 – 5.9, 25m – “The Sport Pitch”
Climbs the wide corner system. one #4 protects the start otherwise the rest of the pitch is fully bolt protected, it is possible to avoid any wide crack moves by face climbing and stemming but this will bump the letter grade up a notch.
Can link with P18 (40m linked)
P18 – 5.9, 15m – “Chimney Pitch”
Walk up the stairs into the back of the chimney, a nice finger crack eases the difficulty until an awkward section leads past a bolt towards the light, a few tough wriggles at the end will keep you honest.
Move
Move the belay left 5 m to a single bolt belay
P19 – 5.8, 12m
A crux mantle early on gives way to a nice double hand crack and a finely situated belay where you can admire the following pitch.

Finishing P19
P20 – 5.10a, 40m 35m – “Obvious Corner”
Climb the strikingly obvious corner, steep and sustained. #3 useful near the top.
Starting P20
Walk
Walk approximately 100m through boulders to the bottom of another striking, right facing corner.
P21 – 5.8, 40m 35m – “Four Star Corner”
Climb the attractive fingers and hands corner crack a on perfect, green tinted granite. An awkward roof crux around a big block leads to the anchor.
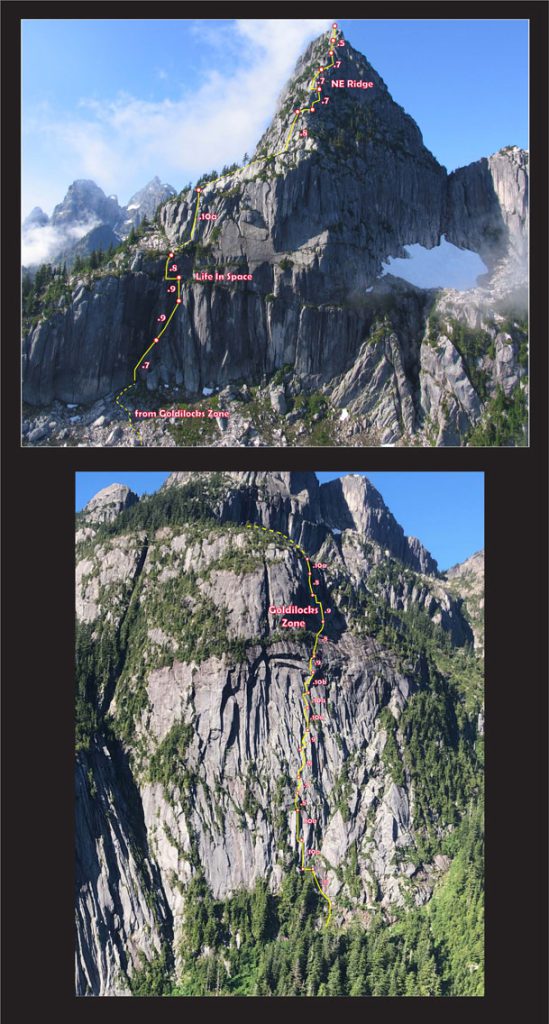
At this point the climb merges with the NE Ridge. Many variations are possible but the best climbing alternates to either side of the ridge seeking out the best quality pitches. Following the description will reward you with a classy alpine rock experience. The subsequent pitches do NOT have bolted anchors. There’s typically flagging to help direct you the right way.
P22 – 5.6, 12m
Traverse immediately right of the belay and up a short splitter fingers step.
Can be simul’d through to the top of P27 in one block.
P23 – 5.7, 20m
Traverse right along a narrowing ledge on the north side of the ridge and then up a steep handcrack.
P24 – 5.7, 30m
Two perfect handcrack options present themselves on the east side of the ridge, the lefthand being the longest. Continue up bushy terrain until the ridge steepens again.
P25 – 5.7, 30m
Walk rightwards to the north side of the ridge, ignore the first two blocky and loose looking systems as the third system provides another solid handcrack.
P26 – 5.5, 20m
climb the literal arete of the ridge moving to the left side of the ridge.
P27 – 5.5, 20m
The last steep step of the ridge has several good options all of which culminate in a sudden arrival on the summit of Habrich, a perfect alpine top out!
Descent
1.4 miles, 3,541 ft descent.
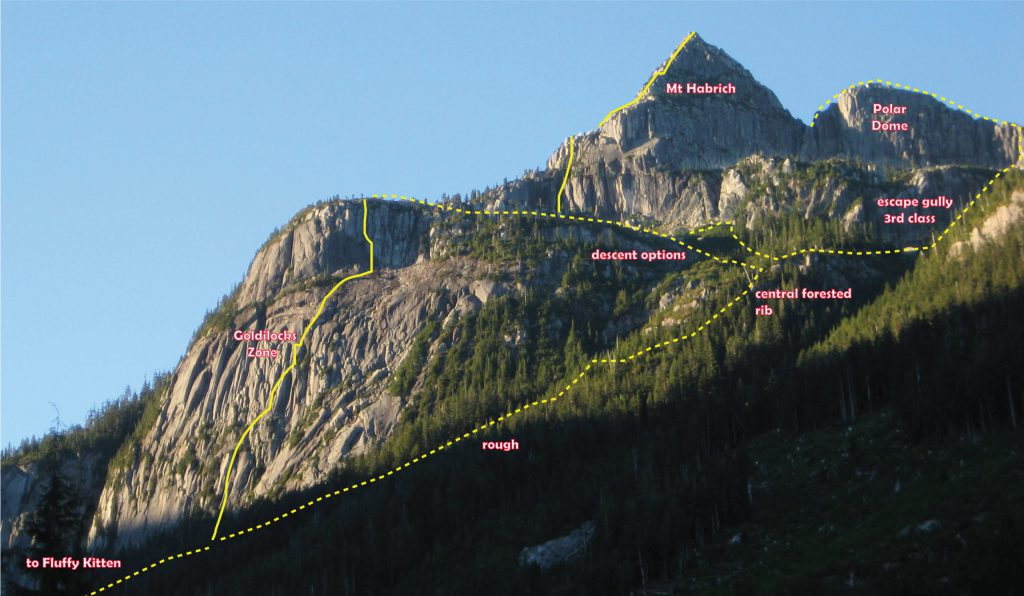

From the top of Mt Habrich (from the anchor you topped out on), make 5 to 6 straightforward rappels (a little walking between some of them) toward the west to the notch between Habrich and Polar Dome.
Then hike over Polar Dome 0.2 miles to the next notch.
Then descend the escape gully north into the lower basin and ascend slightly east to gain the forested rib descent for Goldilocks Zone, this descent is rough with several handlines and will be very difficult to follow in the dark ~2+ hours from the notch.
Plans
Life in Space 2023
Weather Dawn: 4:40 AM, Sunrise: 5:21 AM, Sunset: 9:15 PM, Dusk: 9:56 PM https://www.mountain-forecast.com/peaks/Round-Mountain-volcano/forecasts/1646 Summit is 5,800 ft, halfway ledge is 4,500 ft, start of climb is 3,000 ft, trailhead is 2,000 ft. Summit forecast Start of climb forecast Itinerary as a day trip Saturday 4:00 AM – Start hiking 5:15 AM – Base 5:30…